Lumbar Punctures
An interactive 3D tutorial
Introduction
This module will guide you through common considerations when performing a lumbar puncture (spinal tap). This content is largely based on what we do at our institution and provided as a guideline, and is by no means definitive. Moreover, your institution should have a policy document detailing specifics, and finding that should be your first step.
A lumbar puncture (LP) or spinal tap is a very common image-guided spinal procedure. It involves passing a needle into the subarachnoid / intrathecal space. Most commonly, the purpose is to obtain a sample of CSF for diagnostic and occasionally therapeutic purposes. The same needle position is also used to inject contrast for myelograms and intrathecal chemotherapy.
If you do nothing else, watch this short video covering some highlights of this module:
Pre-Procedure
Questions
You’ve just received an LP request. The following are good questions to ask:
First of all, fluoro-guided lumbar punctures are the end of the line. Flurosocopy is expensive and radiating, and most radiology departments are not staffed to perform numerous lumbar punctures. The intention is to only do fluoro-guided lumbar punctures when there is a compelling reason it cannot just be done bedside. These reasons include obesity, severe lumbar degenerative disease, prior lumbar fusion, and a failed attempt on the floor. Press them on these issues, and make sure there is a reason that justifies fluoroscopy.
Is the patient consentable? If not, who can you consent? (Get a phone number) If no one is available for consent, you can do a 2 physician consent.
Is the patient too altered to tolerate the procedure? Fluoroscopy will not change that.
Anti-coagulation parameters: Your institution should have a policy on this, and the latest JVIR guidelines provide a good starting point. INR, platelets, and anti-coagulation medications are common considerations.
How much CSF should you collect? This is based on the labs requested. Contact your local laboratory to find out what volumes they prefer. The ARUP labs website is also useful for a starting point – you can search for any test and they detail the amount required. Here are some rough guidelines:
- Cell count: 1 cc
- Culture: 1 cc
- PCR (e.g. for HSV): 1 cc
- Glucose and Protein: 2-3 cc
- Pathology or cytology: full tube (7-10 cc)
Imaging Review
Review any recent brain imaging. If there is an intracranial mass with early herniation, you could worsen the herniation by removing CSF. Brain imaging is not strictly required, but if there is any concern for increased intracranial pressure or focal neurologic deficits, at least get a CT head first. This can manifest in the outpatient setting, for example with patients getting worked up for multiple sclerosis (neurologic deficits) or idiopathic intracranial hypertension (papilledema).
Review any recent lumbar spine cross-sectional imaging. This will help you select an appropriate level based on degenerative disease or other pathology such as a soft tissue abscess.
Lumbar spine imaging can also be used to estimate required needle length. The standard lumbar puncture needle is 3.5" (8.9 cm). Have a low threshold for just starting with a longer needle if there is any question.
Consent
Some useful points when obtaining LP consent:
The most common complication is a post-procedure headache caused by pressure alteration after removing CSF. Risk factors include female gender, younger age (20-40), and history of prior LP headache. It is common practice for patients to lie flat for 45 minutes after the procedure, though studies suggest this does not reduce incidence of headaches. If they get a headache, encourage them to drink lots of fluids. There is about 150 mL of CSF in the body, and you make about 20 mL/hour. That means you will replace the volume removed in about an hour, and you turn over your entire CSF volume about three times per day.
CSF leak is another potential complication. Using the smallest gauge needle possible and entering the thecal sac with a longitudinal bevel orientation decrease the risk of CSF leak.
Sometimes patients may feel pain radiating down their leg once the spinal needle is in the right spot. Unfortunately this is unavoidable and always very brief. It's helpful to warn them of this upfront though.
Bleeding, infection, and damage to surrounding structures are all very small risks that are present any time you put a needle in the body.
Anatomy
First and most basically, the goal of a lumbar puncture is to get spinal fluid from the lumbar spinal canal. Put more specifically, you want to pass the needle through subcutaneous fat, paraspinal muscles, and epidural space into the intradural extramedullary AKA intrathecal AKA subarachnoid space where CSF resides.
Meninges and Epidural Space
Just like in the brain, the spinal cord is surrounded by meninges (dura and arachnoid). Some important points:
- Lesion location is classically described as extradural (outside the dura), intradural extramedullary (inside the dura but outside the spinal cord), and intradural intramedullary (inside the cord).
- The intradural extramedullary space (a.k.a intrathecal or subarachnoid space) contains the CSF and nerve roots and spinal cord.
- The epidural space surrounds the dura and extends along the nerves through the foramina. The epidural space contains semi-liquid fat, lymphatics, arteries, loose areolar connective tissue, the spinal nerve roots, and an extensive plexus of veins. Visualizing the boundaries of the epidural space is important for the accurate needle placement for certain types of spine injections.
- The dorsal epidural space in the adult measures about 0.4 mm at C7-T1, 4.1 mm at T11-12, and 4-7 mm in the lumbar region.
- The epidural space is bounded superiorly by the fusion of the spinal and periosteal layers of the dura mater at the foramen magnum. Inferiorly, it is bound by the sacrococcygeal membrane. The space is bounded anteriorly by the posterior longitudinal ligament, vertebral bodies and discs while the pedicles and intervertebral foraminae form the lateral boundary. The ligamentum flavum, capsule of facet joints and the laminae form the posterior boundary of the epidural space.
- With degenerative disease, thickening and calcification of the ligamentum flavum can narrow the dorsal epidural space.
Bones
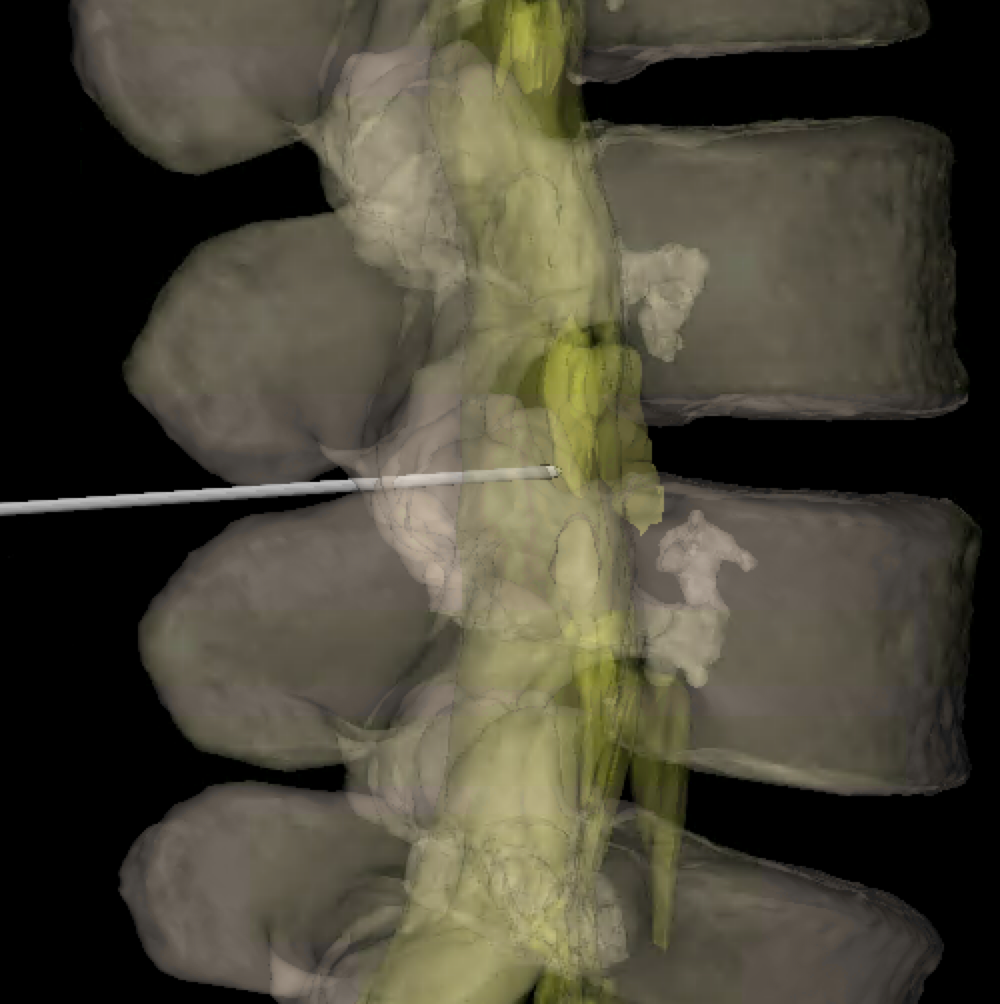
A few bony features of the vertebrae are key for understanding lumbar punctures. Click through the labels on the adjacent 3D model to see them highlighted.
- Facet joints are formed by an articulation between the superior (1) and inferior (2) articulating processes (SAP, IAP). These are named relative to the vertebrae they arise from. So, the SAP will be inferior to the IAP it articulates with - e.g. the L5 SAP articulates with the L4 IAP as shown on the model.
- The SAP and IAP are contiguous with the adjacent lamina (3).
- The space between the laminae is called the interlaminar space (4), which is the target for lumbar punctures.
- The spinous process (5) protrudes posteriorly at the midline. While bedside LPs typically aim to go between the spinous processes, it's generally good to avoid them during fluoro-guided LPs.
Fluoroscopy
The following are my major take-aways from fluoroscopy physics as they apply to lumbar punctures, all learned from the RSNA Physics Modules:
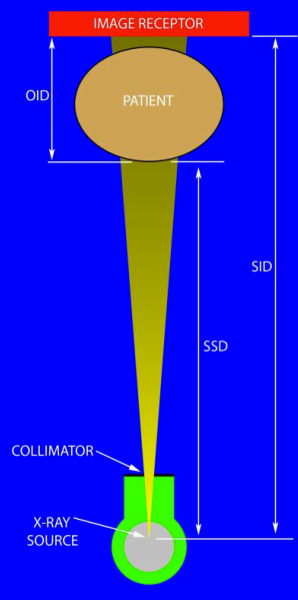
Key geometries of fluoroscopy: source-to-image distance (SID), source-to-skin distance (SSD), and object-to-image distance (OID)
- Use the lowest pulse rate available to reduce patient dose. Often this is 3 FPS. Lumbar punctures are not a dynamic study. If I could just take a single pulsed image at a time I would do that.
- Don't have a lead foot. Similar to above, lumbar punctures are not a dynamic study. You should never find yourself holding your foot on the pedal. A single image will always suffice. Challenge yourself to be under 10 seconds of radiation for any case.
- Collimate. "Cone in" the image to focus on the smallest area possible. Collimation has many benefits. It reduces scatter, improving image contrast / quality. It also reduces dose by limiting radiation to unnecessary parts.
- Minimize OID. Object-to-image distance is the distance from the patient to the image receptor. As you move the receptor up, less x-rays reach it, and the x-ray tube will output more radiation to maintain image quality. So keep it as close as possible to the patient. This will not be as comfortable for you, because you won't have as much room to work. Try to minimize it anyway.
- Radiation dose to you is 0.1% that of the patient at 1 meter away. Be mindful of your distance from the x-ray tube, as a little distance dramatically decreases your dose.
Procedure
Level Selection / Patient Evaluation
Before starting the procedure, it's great if you have some prior lumbar imaging to review. Here are some pointers to consider when choosing a level to perform the LP:
- The goal is to get a needle past the posterior elements, through the interlaminar space, and into the spinal canal to get CSF. That means you have an intact interlaminar space that isn't effaced by degenerative disease, and the spinal canal isn't severely narrowed. If you have imaging to review, just pick a level that fits that and is below L1-2.
- Post-operative levels aren't great. They may look tempting because the patient has had laminectomies, but there's often scar tissue that is hard to get through and more painful for the patient.
- If you don't have cross-sectional imaging, then consider these factors:
- L1-2 contains the conus, so never go there
- L2-3 and L3-4 are your best options
- L4-5 is the most common level to have severe spinal canal narrowing, so not the best
- L5-S1 occasionally may not contain CSF, with the spinal canal terminating above that level. So not the best if performing blind. If you have imaging showing CSF though, L5-S1 is often the "widest open" interlaminar space.
- It's preferable to have the vertebral body as a "backstop", so pick a level where the interlaminar space isn't superimposed over a disc if possible. However, with experience and better "feel" this isn't as critical.
Needle Approach
First some useful general points about needle-based procedures:
- Don't confuse needle depth with progress. I spend most of my time very superficial, trying to establish the right trajectory. Once you have the right trajectory, the rest is easy. Don't be afraid to just pull the needle out and reposition.
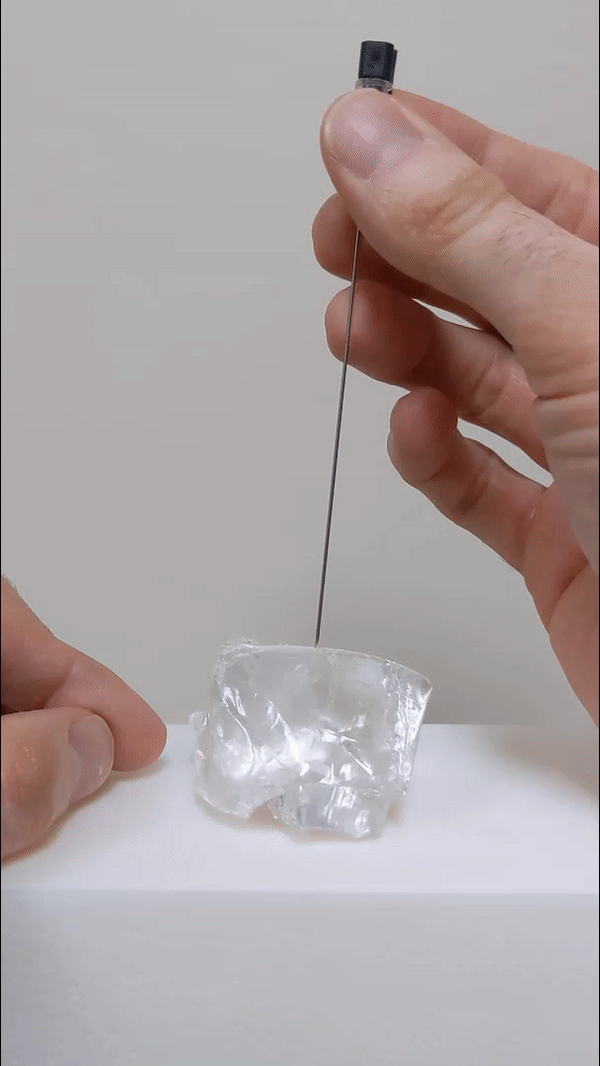
- Understand how to drive a needle. The adjacent video shows how. The notch at the needle hub points to the needle bevel. The bevel will naturally drive the needle in the opposite direction. So just point the notch in the opposite direction of where you want to go, bowstring the needle in the opposite direction as well, and the needle will go where you want. This method is so much easier than driving from the hub, which is your first instinct.
A few comments on needle trajectory. (Follow along with the description below by clicking through the annotated 3D model to the right.) Notice the shape of the lamina on the adjacent lumbar spine model. I used to think of vertebrae as roughly a circle, and the lamina as just a thing band connecting the spinous proces to the pedicle. But that's an oversimplification. The lamina is actually very broad and sloped "up and in" towards the interlaminar space. Given that, I always enter the skin inferolateral to the interlaminar space (1), and aim "up and in" towards the interlaminar space, advancing my needle with the bevel down. This has a few advantages:
- Avoids the spinous processes: The spinous processes can become very bulky, and it's difficult to get past them if you aim straight down at the interlaminar space. If you start down and out and aim up and in, you'll sail past well lateral to the spinous processes.
- Uses the slope of the lamina in your favor: Worst case, if you hit the inferior lamina with your needle, just aim superiorly with the bevel down, and the needle bevel will glide easily up along the lamina (2). If you hit the superior lamina, good luck redirecting inferiorly and making it through the interlaminar space.
You also want the needle to enter at the midline, not way lateral, because midline is where the spinal canal is the widest (3).
You can just lay the patient prone and enter the skin inferomedial to the neural foramen (4). Or you can roll them slightly oblique and "open up" the interlaminar space (5). This is preferred, as it gives you a bigger target on fluoro.
Finally, make liberal use of cross table lateral x-rays. This should be possible in any fluoro room. They take a few minutes, and you immediately know how deep your needle is.
You can ignore all the above advice and probably be fine on a young thin patient. Things get trickier when the anatomy is distorted by scoliosis, degenerative disease, or prior surgery. Click through some examples on the adjacent severely degenerative spine model. Since fluoroscopy should be reserved for more difficult patients, distorted anatomy is more typical. So to summarize, set yourself up for success by doing as many of these things as possible on every case:
- Slightly oblique the patient to open up the interlaminar space
- Direct the needle "up and in" towards the interlaminar space
- If you hit the lamina, direct more superiorly
- Use cross table laterals to determine needle depth if in doubt
Troubleshooting
Pain
If the patient feels pain shooting down their leg, that usually means your needle is in the right spot and it's time to stop advancing. However, occasionally patients can get radiating pain when the needle is well behind the spinal canal within the paraspinal soft tissues or against the spinous process, far away from any major nerves. It's uncertain why this happens, but something to be aware of and not typically a cause for concern. Giving them more lidocaine at that point is reasonable.
Rarely patients may experience extreme pain when the needle tip is intrathecal. The most common reason for this is arachnoiditis, a condition where there was intrathecal inflammation that leads to clumping of the nerve roots and makes them very irritable. This can be confirmed on MRI.
No CSF
If you advance your spinal needle, feel a "pop", pull the stylet out, and get CSF, then congratulations! You've had a textbook lumbar puncture. Unfortunately, this is not always the case. We'll discuss some common reasons for not getting CSF returns and troubleshooting methods.
Reasons for not getting CSF:
- Your needle isn't in the right spot - either too deep, too shallow, and too far lateral
- The patient's CSF pressure is too low to spontaneously come out of the needle
- There is severe degenerative spinal canal narrowing at the level you've entered.
- There is abundant epidural fat effacing the CSF space
- You're at L5-S1 and there's no CSF at this level
Troubleshooting methods:
- First, confirm your needle depth with a cross table lateral x-ray.
- Once your needle is in the right location, you have to assume the CSF pressure is too low. There are several things you can try in this situation:
- Have the patient cough or valsalva. This increases venous pressure, which squeezes the CSF space and increase resistance to CSF drainage, increasing CSF pressure.
- Elevate the patient's head by raising the fluoroscopy table. This is just using gravity to increase CSF pressure.
- Use a syringe to suction CSF. This has been a controversial technique in the past due to the risk of suctioning a nerve root and causing pain. If done carefully, this is a safe technique. First, get a 5 mL syringe and "break the seal" on it by pulling the plunger back. Attach the syringe to tubing that is attached to the needle. Then, apply very gentle backpressure. CSF should flow very easily. If it doesn't, then stop. You may have a different issue. If it is flowing, apply gentle backpressure for a few seconds and then release, to avoid unwittingly applying increasing pressure. Also be mindful of how fast CSF flows spontaneously. You'll wait 30 seconds to get a mL, so go extremely slowly.
- If you still don't have CSF, try another level.
- If 2-3 levels are unsuccessful, consider getting lumbar spine imaging (preferably MRI) to further assess (if they don't already have it).